

Smarter AI Dashcam G - Installation Guide
I. Multilingual Installation Guide
Veuillez télécharger le manuel dans votre langue en scannant le code QR ci-dessous.
Descargue el manual en su idioma escaneando el código QR a continuación.
Baixe o manual em seu idioma digitalizando o código QR abaixo.
Bitte laden Sie das Handbuch in Ihrer Sprache herunter, indem Sie den untenstehenden QR-Code scannen.
Scarica il manuale nella tua lingua eseguendo la scansione del codice QR riportato di seguito.
Lütfen aşağıdaki QR kodunu tarayarak kendi dilinizdeki kılavuzu indirin.
يرجى تنزيل الدليل بلغتك عن طريق مسح رمز الاستجابة السريعة أدناه.
אנא הורד את המדריך בשפתך על ידי סריקת קוד ה-QR למטה.
Pobierz instrukcję w swoim języku, skanując poniższy kod QR.
Laai asseblief die handleiding in jou taal af deur die QR-kode hieronder te skandeer.
Download de handleiding in uw taal door de onderstaande QR-code te scannen.
Ladda ner manualen på ditt språk genom att skanna QR-koden nedan.
Last ned bruksanvisningen på ditt språk ved å skanne QR-koden nedenfor.
Download venligst manualen på dit sprog ved at scanne QR-koden nedenfor.
Stáhněte si příručku ve svém jazyce naskenováním QR kódu níže.
Vă rugăm să descărcați manualul în limba dvs. scanând codul QR de mai jos.
Stiahnite si príručku vo svojom jazyku naskenovaním nižšie uvedeného QR kódu.
Kérjük, töltse le a kézikönyvet az Ön nyelvén az alábbi QR-kód beolvasásával.
Κάντε λήψη του εγχειριδίου στη γλώσσα σας σαρώνοντας τον κωδικό QR παρακάτω.
II. Data Protection & Consent
WARNING! :Use of Smarter AI cameras and platform is subject to our Customer End User License Agreement, available here:
AT&T is a registered trademark of AT&T Inc. and/or its affiliates. Telus is a registered trademark of Telus Inc. and/or its affiliates. Verizon is a registered trademark of Verizon Communications Inc. and/or its affiliates. T-Mobile is a registered trademark of T-Mobile USA Inc. and/or its affiliates. Rogers is a registered trademark of Rogers Wireless Inc. and/or its affiliates. FirstNET is a registered trademark of the U.S. Department of Commerce, First Responder Network Authority. GEOTAB, GEOTAB IOX, GEOTAB MARKETPLACE, MY GEOTAB, GO, GO RUGGED, GO9 & RUGGED are registered trademarks of Geotab Inc. and/or its affiliates. IOX is a trademark of Geotab Inc. and/or its affiliates.
III. What’s in the Box
Smarter AI Dashcam G
Mounting kit
I/O cover
M2 hex key wrench (2mm)
Alcohol wipe
Installation Guide
Automotive-grade MicroSD card
4 x Recording warning window stickers
Smarter Cable G

Note: An Extension Camera (Smarter AI Dashcam - Rear Cam) can be purchased separately.
Note: The Smarter AI Dashcam G is exclusively designed to work in conjunction with the following products:
Geotab® GO9®
Geotab® GO9® RUGGED® also known as
GO RUGGED® (RHN-RX06S4 required)
Warning: Do not attempt to adjust the camera lens viewing angle without loosening the corresponding locking screw first.
IV. Smarter AI Dashcam G Overview
Smarter AI Dashcam G EMEA, LATAM, North America, AT&T®, FirstNet®, T-Mobile®, Telus®, Rogers®
Tamper-proof sensor
MicroSD card slot
SIM card slot
Reset button (not in use)
Power port
Extension camera port
NFC sensor
Camera locking screw (x2)
Noise cancelling microphone
Driver accessible programmable emergency button
Cellular/Wi-Fi indicator
Cabin camera with Infrared illuminators
Mounting kit
Speaker
Road camera
Antenna
I/O cover
Truck cable cap (optional)

Smarter AI Dashcam G ANZ & SA
Tamper-proof sensor
MicroSD card slot
SIM card slot
Reset button (not in use)
Power port
Extension camera port
NFC sensor
Camera locking screw (x2)
Noise cancelling microphone
Driver accessible programmable emergency button
Cellular/Wi-Fi indicator
Cabin camera with Infrared illuminators
Mounting kit
Speaker
Road camera
Antenna
I/O cover
Truck cable cap (optional)

V. Smarter AI Dashcam G Installation
Precautions and notices
The Smarter AI Dashcam G has been tested and certified to meet the applicable limits for Radio Frequency (RF) exposure. It should be installed and operated with a minimum distance of 30cm/12” between the Dashcam and your body.
Using the Smarter AI Dashcam G does not exempt the driver from taking full responsibility for their driving behavior, which includes observing all traffic rules and safety regulations.
WARNING! : accessories, including cables, so that it does not obstruct the driver’s view or interfere in any way with the deployment of airbags or with any other vehicle safety systems. Ensure that the Smarter AI Dashcam G position does not obstruct any ADAS vehicle sensors (cameras or any other sensors) and is no in the way of airbag deployment as the Smarter AI Dashcam G could become a potentially hazardous projectile, posing a safety concern.
Make sure that no object is blocking the camera lens, and that no reflective material appears near the lens. Please keep the lens clean.
Tinted windshields may reduce video quality.
Some tinted windshields, especially those with a reflective coating, may be athermic and impact GPS reception. If you have difficulty positioning the Dashcam, please mount it in a “clear area.”
The Smarter AI Dashcam G will automatically calibrate its accelerometer and gyroscope during startup. Power on the Dashcam after mounting it to ensure proper calibration.
The Smarter AI Dashcam G must be connected to a Geotab GO9 or Geotab GO9 RUGGED IOX bus using the supplied Smarter Cable G.
The IOX bus supplies 2.5 A at 12 VDC. The Smarter AI Dashcam G has a peak power consumption of 0.8 A at 12 VDC. Please ensure that the total current draw on the IOX bus does not exceed 2.5 A.
The Smarter AI Dashcam G must be installed by properly trained, professional installers only.
Installation procedure

A. Smarter AI Dashcam G SIM and SD Card Management
The Smarter AI Dashcam G comes with a Cellular Data Plan and an Automotive-grade SD Card. The Smarter AI Dashcam G has a Nano SIM card slot (4FF) as well. This Nano SIM card slot (4FF) can only be used by Smarter AI SIM cards. Using your own Cellular SIM and Data Plan is subject to approval. Please contact you Geotab or Smarter AI representative.
To insert a SIM or SD card, follow these steps:
Hold the card by the edges and insert it gently into the slot, as shown in the illustration.
To eject an inserted card, press on it gently until it pops out.Hold the card by the edges and insert it gently into the slot, as shown in the illustration.
To eject an inserted card, press on it gently until it pops out.
Hold the card by the edges and insert it gently into the slot, as shown in the illustration.
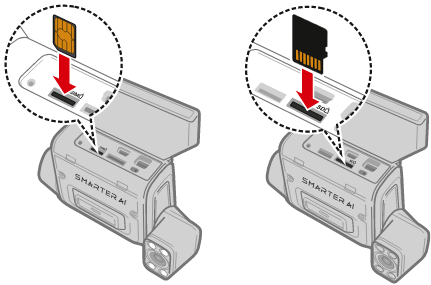
Note: Only MicroSDXC cards provided by Smarter AI are supported. Using 3rd party cards is not supported and can result in recording problems, as well as a high Micro SD card field failure rate. Smarter AI offers 128, 256 and 512 GB, Automotive-grade, MicroSDXC cards as accessories.
B. IOX bus considerations and installation
The Smarter AI Dashcam G works exclusively with a Geotab GO9 or Geotab GO9 RUGGED. The Smarter AI Dashcam G connects to the IOX bus of a commissioned Geotab GO9 or GO9 RUGGED through the Smarter Cable G. IOX Add-Ons or IOX Extension cables are supported on the IOX bus, as long as the total length of the IOX bus doesn’t exceed 5 m / 16.4 ft and that the total current draw on the IOX bus doesn’t exceed 2.5 A.
Geotab® GO9® - Direct Connection
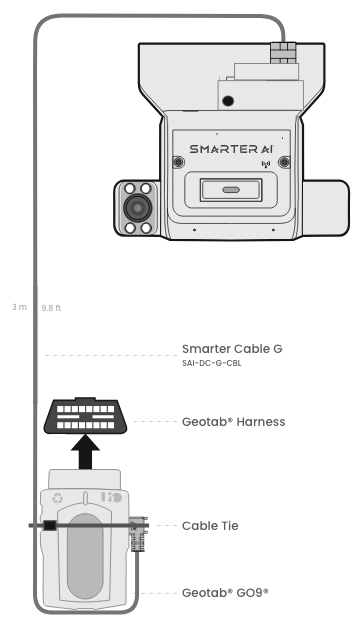
Plug the Smarter Cable G into the IOX port of the GO9, like in the illustration below. Use the supplied cable tie to, at the same time, secure the Smarter Cable G plug and the Smarter Cable G on the side of the GO9.
For vehicles requiring a longer cable run, Geotab supplies the following, optional, 2 m / 6.5 ft IOX Extension Cables:
HRN-IOXEXT
HRN-IOXEXT-A
No IOX Add-Ons are supported with IOX Extension Cables as an IOX Extension Cable bring the IOX bus length to it’s maximum length of 5 m / 16.4 ft.
To install a Smarter AI Dashcam G with an IOX Extension Cable, plug the IOX Extension Cable into the IOX port of the GO9, like in the illustration below. Use the supplied cable tie to, at the same time, secure the IOX Extension Cable plug and the IOX Extension Cable on the side of the GO9. Then, connect the Smarter Cable G plug to the IOX Extension Cable female plug. Secure this connection with the supplied cable tie.

Geotab® GO9® - IOX Add-Ons
There is a wealth of IOX Add-Ons available in Geotab Marketplace . IOX Add-Ons are supported on the IOX bus with a Smarter AI Dashcam G with the following conditions:
The total current draw of devices on the IOX bus should not exceed 2.5 A.
The total length of a properly terminated IOX bus should not exceed 5 m / 16.4 ft.
The cumulative length of IOX Add-Ons’ IOX bus should not exceed 2 m / 6.56 ft.
No IOX Add-On should be the last device on the IOX bus, the Smarter AI Dashcam G is the latest device on the IOX bus.
IOX Add-Ons should be installed and secured with cable ties. The Smarter Cable G plug should be connected to the last IOX Add-On IOX port, like in the illustration below. Secure the Smarter Cable G plug with the IOX Add-On with the supplied cable tie.

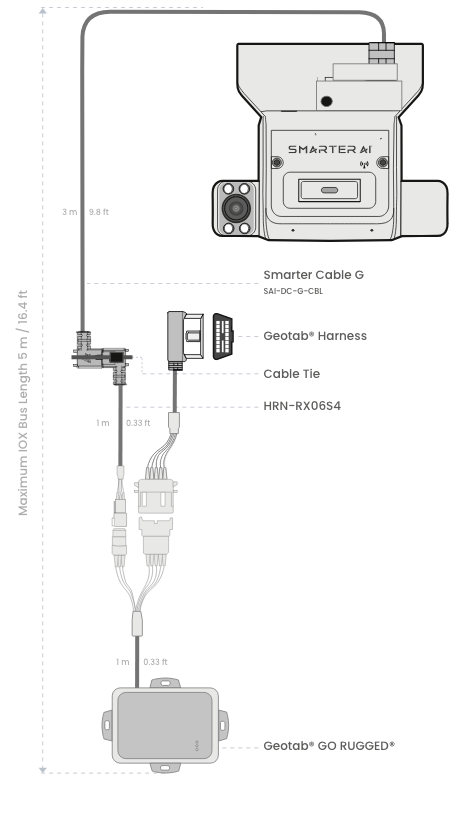
Geotab® GO9® RUGGED
The Geotab GO9 RUGGED needs an adapter cable (HRN-RX06S4) to expose it’s IOX bus. Once this adapter cable is installed, the IOX bus length of the Geotab GO9 RUGGED is 2 m / 6.5 ft. No IOX Extension Cable or IOX Add-Ons can be used in conjunction with the Smarter AI Dashcam G, as the maximum length of the IOX bus should be 5 m / 16.4 ft.
To install a Smarter AI Dashcam G with a Geotab GO9 RUGGED, connect the HRN-RX06S4 adapter cable to the Geotab GO9 RUGGED cable harness. Then, plug the Smarter Cable G into the HRN-RX06S4 female IOX plug, like in the illustration below. Use the supplied cable tie to secure the HRN-RX06S4 female IOX plug and the Smarter Cable G plug.
Please note that the IOX plugs are not weatherproof.
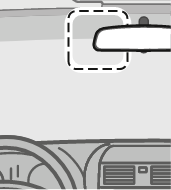
C. Positioning and attachment
Place the Smarter AI Dashcam G near the rearview mirror. Ideally, the Smarter AI Dashcam G should be as close as possible to the vehicle center and as in front of the driver’s face as possible. Make sure that the driver’s field of view is not obstructed as well as both cameras’ field of view is not blocked.
2. Clean the windshield with the Alcohol wipe before mounting the Smarter AI Dashcam G Mounting Kit. Make sure that the windshield surface is dry and free of condensation. Peel the film off the back of the Mounting Kit. Attach the Mounting Kit onto the windshield and press firmly for approximately 30 seconds.
Wait at least one hour (for very harsh environments, such as extremely hot or cold weather, extremely bumpy roads, etc., Smarter AI recommends a 24-hour waiting period) before attaching the Smarter AI Dashcam G to the Mounting Kit for long-lasting adherence.

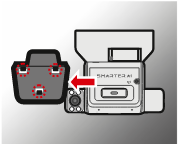
3. Attach the Smarter AI Dashcam G to the Mounting Kit by matching the three mounting holes’ position on the back of the camera with the Mounting slots on the Mounting Kit. Slide the Smarter AI Dashcam G to the left to lock it in place.
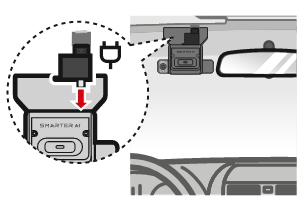
4. Connect the Power Port connector of the Smarter Cable G to the Smarter AI Dashcam G.
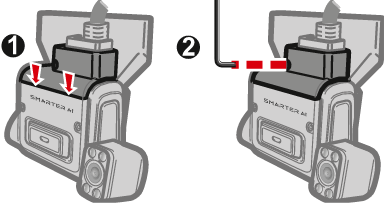
5. Attach the I/O Cover to the Smarter AI Dashcam G and tighten the screw with the provided M2 hex key wrench.
6. Optional for larger windshields - Cover the exposed cable with the optional Truck Cable Cap. The Truck Cable Cap can be trimmed to the desired length. Peel the 3M tape off from the Truck Cable Cap before attaching it to the windshield. Alternatively, Smarter AI offers optional Tie Down Squares to guide cables on windshields.

D. Extension Camera installation (optional)
The Smarter AI Dashcam G supports an optional rear-view Extenstion Camera, the Smarter AI Dashcam - Rear Cam (purchased separately). Before installing the Smarter AI Dashcam - Rear Cam, please wipe the surface clean with rubbing alcohol. Select a suitable location for mounting the Smarter AI Dashcam - Rear Cam so that the driver’s field of vision is not blocked.
Smarter AI Dashcam - Rear Cam:

Plug the cable’s micro-USB connector into the Smarter AI Dashcam - Rear Cam and the mini-USB connector into the Smarter AI Dashcam G Extension camera port. Please note that you will have to remove the truck cable cap and I/O cover to access the Smarter AI Dashcam G Extension Camera Port located next to the Power Port. Use the same method described below, in paragraph F, to adjust the Smarter AI Dashcam Rear Cam’s viewing angle.
WARNING: Position the Smarter AI Dashcam - Rear Cam and any accessories, including cables, so that it does not obstruct the driver’s view or interfere in any way with the deployment of airbags or with any other vehicle safety systems.

E. Commissioning
Install the Smarter AI Mobile App on your Android or iOS device:

https://smarterai.camera/app/android

https://smarterai.camera/app/ios
2. The Smarter AI Dashcam G has to be installed by professional / trained installers.
As an installer, login into the Smarter AI Mobile App, using your credentials. If you don’t have credentials yet, please register to create an account.

3. Power the Smarter AI Dashcam G up.
Note:
Make sure that the Geotab GO9/Geotab GO9 RUGGED is powered and that the Smarter AI Dashcam G is connected using the Smarter Cable G.
Warning! Ensure that you have adequate ventilation if the engine is running at any time during the installation process.
Ensure that you are in a location with cellular coverage.
The Dashcam is ready to be onboarded when the Cellular/Wi-Fi indicator blinks blue.

4. Open the Smarter AI Mobile Application and launch the Installer Mode.
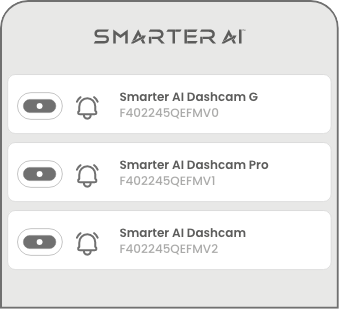
If multiple Dashcams are present, select the right one with the chime/LED identification tool. Follow the Smarter AI Mobile Application instructions to install the Dashcam.
F. Viewing angle adjustment
Loosen the camera locking screw of the road and cabin cameras with the M2 hex key wrench. Adjust the viewing angle using the live view displayed on the Smarter AI Mobile App.

2. Park the vehicle on flat terrain to adjust the road camera. The recommended ratio for the road camera is 1:1. This means that the optimal field of view (FOV) for the road camera should be 1/2 above the horizon and 1/2 below the horizon.

3. Position the cabin camera vertically to view the driver’s head and the whole cabin. Please ensure that no object is blocking the field of view of the dashcam, even partially, and avoid highly reflective objects as they might cause reflections with the Infrared Illuminators.


4. Tighten the camera locking screw to lock the camera position once the angle is set.
5. Follow the Smarter AI Mobile App instructions. Once finished, the Dashcam is ready to be used.
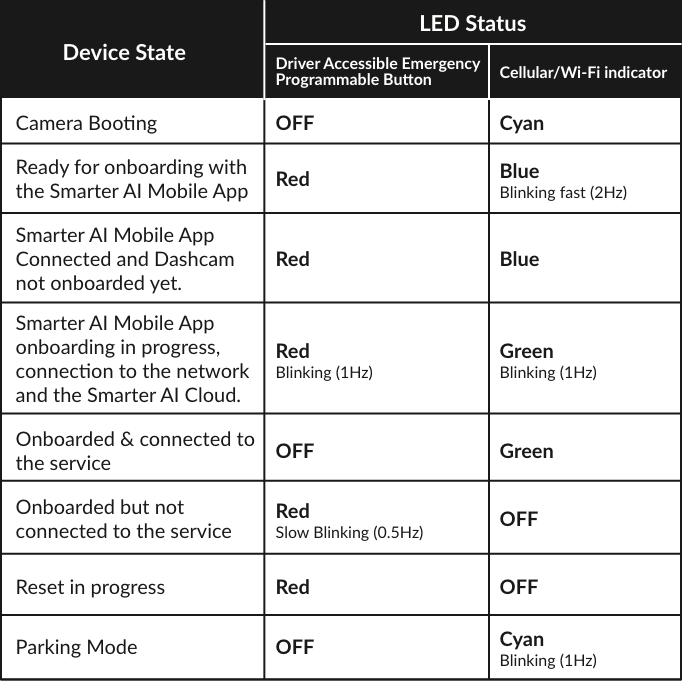
VI. LED Indicators
VII. Additional Information
Caring for your device
Taking good care of your device will ensure trouble-free operation and reduce the risk of damage.
Keep your Smarter AI Dashcam G away from excessive moisture and extreme temperatures.
Avoid exposing your Smarter AI Dashcam G to direct sunlight or intense ultraviolet light for extended periods.
Do not place anything on top of your Smarter AI Dashcam G or drop objects on your Smarter AI Dashcam G.
Do not drop your Smarter AI Dashcam G nor subject it to severe shocks.
Do not subject your Smarter AI Dashcam G to sudden and severe temperature changes. It causes moisture condensation inside the Smarter AI Dashcam G, which could damage your Smarter AI Dashcam G. In the event of moisture condensation, allow the Smarter AI Dashcam G to dry out completely before use.
Never attempt to disassemble, repair, or modify your Smarter AI Dashcam G as it will void its warranty and could cause harm or property damage.
Do not store or carry flammable liquids, gases or explosive materials in the same compartment as your Smarter AI Dashcam G. Overheating may damage the Smarter AI Dashcam G.
About GPS
GPS (Freq=1575.42MHz) is operated by the United States government, who is solely responsible for the system's performance. Any change to the GPS system can affect the accuracy of all GPS equipment.
GPS satellite signals cannot pass through solid materials (except glass). GPS positioning is unavailable when you are inside a tunnel or building. Signal reception can be affected by poor weather or dense overhead obstacles (e.g., trees, tunnels, viaducts, and tall buildings).
Regulatory Information
For regulatory identification purposes, the different models of the Smarter AI Dashcam G are assigned the following model number:
Smarter AI Dashcam G North America - N693FT / CDR
FCC
Federal Communication Commission Interference Statement
This device complies with Part 15 of the FCC Rules. Operation is subject to the following two conditions: (1) This device may not cause harmful interference, and (2) this device must accept any interference received, including interference that may cause undesired operation.
This equipment has been tested and found to comply with the limits for a Class B digital device, pursuant to Part 15 of the
FCC Rules. These limits are designed to provide reasonable protection against harmful interference in a residential installation. This equipment generates, uses and can radiate radio frequency energy and, if not installed and used in accordance with the instructions, may cause harmful interference to radio communications. However, there is no guarantee that interference will not occur in a particular installation. If this equipment does cause harmful interference to radio or television reception, which can be determined by turning the equipment off and on, the user is encouraged to try to correct the interference by one of the following measures:
Reorient or relocate the receiving antenna.
Increase the separation between the equipment and receiver.
Connect the equipment into an outlet on a circuit different from that to which the receiver is connected.
Consult the dealer or an experienced radio/TV technician for help.
FCC Caution: Any changes or modifications not expressly approved by the party responsible for compliance could void the user’s authority to operate this equipment.
This transmitter must not be co-located or operating in conjunction with any other antenna or transmitter.
This device contains license-exempt transmitter(s)/receiver(s) that comply with Innovation, Science and Economic Development Canada’s license-exempt RSS(s). Operation is subject to the following two conditions: (1) This device may not cause interference.
(2) This device must accept any interference, including interference that may cause undesired operation of the device.
L’émetteur/récepteur exempt de licence contenu dans le présent appareil est conforme aux CNR d’Innovation, Sciences et Développement économique Canada applicables aux appareils radio exempts de licence. L’exploitation est autorisée aux deux conditions suivantes : 1) L’appareil ne doit pas produire de brouillage; 2) L’appareil doit accepter tout brouillage radioélectrique subi, même si le brouillage est susceptible d’en compromettre le fonctionnement.
This device has been tested and meets applicable limits for Radio Frequency (RF) exposure. This equipment should be installed and operated with minimum distance 30 cm between the radiator and your body.
USA Contact Information
Smarter AI Corporation
8551 W. Lake Mead Blvd., Suite 240
Las Vegas, NV 89128
+1 669 333 9931
https://smarterai.camera
California Proposition 65 Warning
WARNING! : This product can expose you to chemicals including Lead, which is known to the State of California to cause cancer and birth defects or other reproductive harm. For more information, go to www.P65Warnings.ca.gov.
ISED / ISDE
Innovation, Science and Economic Development Canada
CAN ICES-3(B)/NMB-3(B)
Radio Interference Regulations Class B Compliance Notice This Class B digital apparatus meets all requirements of the Canada Interference-Causing equipment regulations. Cet appareil numérique de Classe B respecte toutes les exigences du Règlement Canadien sur le matériel brouilleur.
This device contains licence-exempt transmitter(s)/receiver(s) that comply with Innovation, Science and Economic Development Canada’s licence-exempt RSS(s). Operation is subject to the following two conditions:
This device may not cause interference.
This device must accept any interference, including interference that may cause undesired operation of the device.
L’émetteur/récepteur exempt de licence contenu dans le présent appareil est conforme aux CNR d’Innovation, Sciences
et Développement économique Canada applicables aux appareils radio exempts de licence. L’exploitation est autorisée aux deux conditions suivantes :
L’appareil ne doit pas produire de brouillage;
L’appareil doit accepter tout brouillage radioélectrique subi, même si le brouillage est susceptible d’en compromettre le fonctionnement.
The device could automatically discontinue transmission in case of absence of information to transmit, or operational failure. Note that this is not intended to prohibit transmission of control or signaling information or the use of repetitive codes where required by the technology.
The device for operation in the band 5150–5250 MHz is only for indoor use to reduce the potential for harmful interference to co- channel mobile satellite systems.
High-power radars are allocated as primary users (i.e. priority users) of the bands 5250–5350 MHz and 5650–5850 MHz and that these radars could cause interference and/or damage to LE- LAN devices.
L’appareil peut interrompre automatiquement la transmission en cas d’absence d’informations à transmettre ou de panne opérationnelle. Notez que ceci n’est pas destiné à interdire la transmission d’informations de contrôle ou de signalisation ou l’utilisation de codes répétitifs lorsque cela est requis par la technologie.
Le dispositif utilisé dans la bande 5150-5250 MHz est réservé à une utilisation en intérieur afin de réduire le risque de brouillage préjudiciable aux systèmes mobiles par satellite dans le même canal.
UK Compliance Information
Products marked with the UKCA label comply with the Radio
Equipment Regulations 2017.
Restriction or Requirement in the UK: 5.15-5.35GHz indoor-use only.
This device has been tested and meets applicable limits for Radio Frequency (RF) exposure. This equipment should be installed and operated to ensure a minimum of 20 cm spacing to any person at all times.

Compliance with these directives implies conformity to the following UK harmonization legislations:
EN 301 908-1:V15.1.1
EN 301 908-2:V13.1.1
EN 301 908-13:V13.2.0
EN 300 328:V2.2.2
EN 301 893:V2.1.1
EN 300 440
EN 300 330:V2.1.1
EN 303 413:V1.2.1
EN IEC 62311:2020
IEC 62368-1:2018
(EN 62368-1:2020/A11:2020)
EN 301 489-1 V2.2.3
EN 301 489-3 V2.1.1
EN 301 489-17 V3.2.4
EN 301 489-19 V2.1.1
EN 301 489-52 V1.2.1
EN 55035:2017/A11:2020
EN 50498:2010
ISO 7637-2:2004
Smarter AI cannot be held responsible for modifications made by the User or 3rd parties and the consequences thereof, which may alter the conformity of the product with the UKCA Marking.
UK Declaration of Conformity
Hereby, Smarter AI declares that the N693F / CDR and N693 Dash cam are in compliance with the essential requirements and other relevant provisions of Radio Equipment Regulations 2017.
The Pinnacle, Station Way, Crawley, RH10 1JH, UK
CE
European Union Compliance Information
Restriction or Requirement in the EU: 5.15-5.35GHz indoor-use only in the following countries:

This device has been tested and meets applicable limits for Radio Frequency (RF) exposure. This equipment should be installed and operated to ensure a minimum of 20 cm spacing to any person at all times.
Products marked with the CE label comply with the Radio Equipment Directive (Directive 2014/53/EU) - issued by the Commission of the European Community.
Compliance with these directives implies conformity to the following European Standards:
EN 301 908-1:V15.1.1
EN 301 908-2:V13.1.1
EN 301 908-13:V13.2.0
EN 300 328:V2.2.2
EN 301 893:V2.1.1
EN 300 440
EN 300 330:V2.1.1
EN 303 413:V1.2.1
EN IEC 62311:2020
IEC 62368-1:2018
(EN 62368-1:2020/A11:2020)
EN 301 489-1 V2.2.3
EN 301 489-3 V2.1.1
EN 301 489-17 V3.2.4
EN 301 489-19 V2.1.1
EN 301 489-52 V1.2.1
EN 55035:2017/A11:2020
EN 50498:2010
ISO 7637-2:2004
Smarter AI cannot be held responsible for modifications made by the User or any third party and the consequences thereof, which may alter the conformity of the product with the CE Marking.
RCM
Declaration of conformity
Hereby, Smarter AI declares that the N693F / CDR and N693 Dash cam are in compliance with the essential requirements and other relevant provisions of Directive 2014/53/EU.
ul. Puławska 405 A, 02-801 Warszawa, Poland
Maximum power for each band
Smarter AI Dashcam G - North America
LTE-FDD: B2/ B4/ B5/ B7/ B12/ B13/ B14/ B17/ B25/ B26/ B66/ B71 (25dBm)
LTE-TDD: B41 (25dBm)
WCDMA: B2/ B4/ B5 (25dBm)
About Wi-Fi 2.4 GHz
Frequency: 2412 – 2472MHz
Max. power = 18dbm
About Wi-Fi 5 GHz
Frequency: 5150 – 5725MHz
Frequency: 5725 – 5850MHz
Max. power = 17.5dbm
About BT
Max. power = 11dBm
About BLE
Max. power = 4dBm
WEEE
This product must not be disposed of as normal household waste, in accordance with the EU directive for waste electrical and electronic equipment (WEEE – 2012/19/EU). Instead, it should be disposed of by returning it to the point of sale or to a municipal recycling collection point.